Note: To create one-time or non-renewable products (such as class packs or short-term passes), please create a service (block or time card) instead.
1. Creating a New Membership
- Go to Products > Memberships.
- Click 'New Membership' in the top right corner:

2. Basic Information

- Name of the membership: Choose a clear, descriptive title (e.g. 'Annual Yoga Membership').
- Additional membership info: Optionally include further details or notes.
3. Duration & Renewal

- Membership interval: Select either monthly or weekly.
Attention: Available online payment methods for memberships vary depending on the membership interval.
- Weekly memberships: credit card only.
- Monthly memberships: credit card and SEPA direct debit.
- Minimum duration of the membership: Set the minimum contract period (e.g. 12 months).
- Invoicing period: Set the period in which the invoices should be created (e.g. every month).
Note: If the frequency is greater than 1 week or 1 month (e.g. every 3 months), SEPA Online is not available.
- Enable Promotional Period: Promote new memberships with promotional periods in the first week(s)/month(s) of a membership. You can find more information on this HERE.

- Automatically extend this membership: Enable automatic renewal at the end of the minimum membership term.
- Extension period: Define the extension duration (e.g. 1 month) after the minimum membership term has expired.
- Membership termination (Cancellation Notice): Specify how far in advance clients must cancel (e.g. until the end of the current runtime or until X week(s)/month(s) before the end of the current runtime).
Note: You can select the termination period only in the same interval in which you have set the respective membership interval (weekly memberships can have exclusively weekly termination periods, monthly memberships can have exclusively monthly termination periods).
4. Assign Service Group

- Assign a service group to your membership: You can choose an existing service group or create a new one.
5. Payment Details

- Recurring Payment Amount: Enter the amount billed per period.
- Admission Fee: This optional fee has to be paid only once at the beginning of the membership.
Note: If this fee is set, the membership currently cannot be purchased online by customers.
- Overall Price: Automatically calculated from membership duration and rate.
-
Due Date: Set the specific day invoices are issued each month.
e.g.: If the membership starts on the 10th but invoices are due on the 1st, a prorated charge is applied upon purchasing the membership. The official first contract period then starts with the upcoming 1st of the month.
- Bookkeeping account: Select the account with the appropriate VAT rate for selling this membership.
6. Payment Methods

- Payment method for selling a membership in the Manager: Select a payment method that will be used as the default when manually assigning a membership in the Manager.
Note: Clients purchasing online can choose between credit card and SEPA (if available).
The payment methods available for assigning a membership manually are:
- Open: Invoices are issued automatically, but remain unpaid and must be marked as "Paid" manually.
- Bank Transfer: Invoices are issued automatically and are set to "Paid" with "Bank Transfer" automatically.
- Automated SEPA: Invoices are both issued and debited automatically.
Note: When selecting Automated SEPA as the default payment method for Manager sellings, you will not be able to choose "Open" or "Bank Transfer" when manually assigning a membership. If you (might) need all three payment methods in the future, you can simply select the payment method "Open" here.
7. Membership Content

- Allows participation in: Here you must select the activities for which the membership is valid. If you are in the process of setting up your membership and have not yet created any activities, you can perform this step later.
- Membership terms: Here you can enter contractual terms such as your general terms and conditions or cancellation deadlines.
8. Booking Rules & Termination Reminder
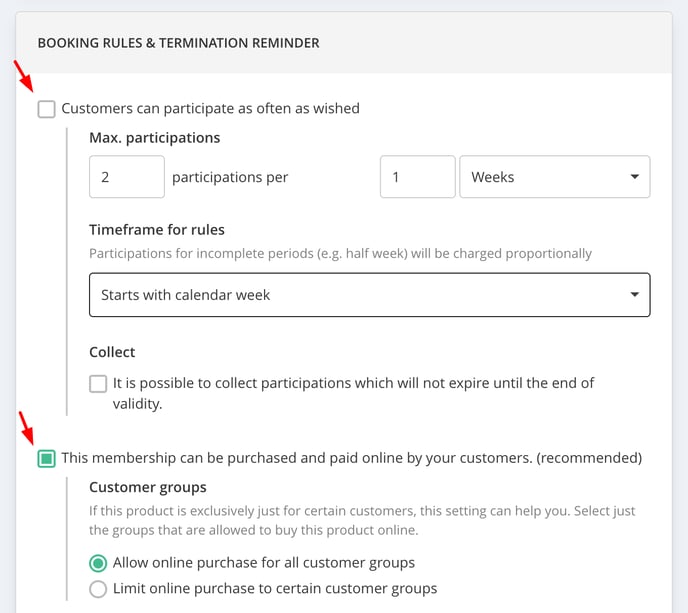
- Limit the number of activity participations: Here you can specify whether the membership should be limited to a certain number of participations per period or include unlimited participations.
- Max. number of participations: Here you can choose between days, weeks and months. For example, limit the membership to two participations per week.
Note: If you work with weekly memberships, you can only specify participations per X days/weeks, not per month.
- Timeframe for rules:
- Standard period: select "Starts with calendar month" if you want the booking period to be the same for everyone, i.e. Monday to Sunday.
- The other option is to select "Starts with assignment": this means that customers receive new credits on the start date of their membership, e.g. Wednesday of each week
- Collect unused participations: Decide whether unused credits roll over to the next period and - if unused - will remain available until the end of the membership validity.
- Online Purchase: Tick the option as shown in the screenshot to allow online purchase of the membership. You can then also specify whether all customer groups can book this membership online or restrict its online visibility and online purchase to specific customer groups only.

- Send termination reminder: Enable automatic email reminders before renewal.
- You can adapt the automatically created message, but make sure not to change the text in the { curly brackets } as they serve as placeholders for information retrieved from our database.
Note: Sending termination reminders is only available for auto-renewing memberships and if the client has enabled their communication preferences for Important updates & information in their customer profile:
9. Finalising the Membership

- Click 'Create Membership and back to overview' on the very bottom to complete the setup. The membership is now ready to be assigned to your customers.