📘 What You’ll Learn
In this guide, you’ll find out how to:
- Choose which widgets best fit your website structure and customer journey
- Combine different widgets to create a clear and engaging flow for your visitors
- Decide when to embed widgets or when to link to them directly
- Connect widgets with user profile pages and login/registration links for a smooth customer experience
📋 Before You Start
Before planning your widget setup, make sure your Eversports Manager is ready. A few quick checks will help you avoid confusion later:
- Check your Manager setup:
Ensure that your activities, service groups, and products are already created in Eversports Manager — only active content can be shown in widgets. - Review your Widget Branding settings:
Upload your logo, choose your brand colors, and verify your studio or brand name. These elements are automatically used for widget styling, as well as for branded login and registration pages. - Access the new Widgets area:
Go to Settings > Widgets [NEW] in your Eversports Manager. This is where you can create, edit, and manage all widgets in one place.
🗺️ Plan Your Website Pages and Get to Know Your Widgets
Before adding any widgets to your website, take a moment to plan your page structure and understand how each widget supports your customer journey.
Each widget serves a different purpose — using them intentionally helps you create a smooth and intuitive booking and browsing experience.
|
Widget |
What it shows |
Where to use it on your site |
Purpose |
|
Your full activity calendar, including classes, courses, or trainings |
On a dedicated Schedule or Timetable page, or as a smaller view on your homepage |
Helps customers quickly find and book regular activities. |
|
|
Special events such as courses, workshops, events, etc. in a card view |
On an general Specials or dedicated Events, Workshops, or Courses page |
Promotes unique or one-time activities. |
|
|
Your offers, such as passes, memberships, and single-entry prices |
On a Prices, Offers, or Memberships page |
Displays what customers can purchase and links to checkout. |
|
|
Gift vouchers available for online purchase |
On a Gifting or Vouchers page, or linked from your navigation or footer |
Encourages gifting and new customer acquisition. |
|
|
Your on-demand video library |
On a Videos or Online Classes page |
Offers digital content to your community. |
🎨 Customize the Look and Feel of Your Widgets
Your widgets automatically use your brand colors, logo, and studio name — creating a consistent experience between your website and the Eversports environment.
You can adjust individual widgets to match your website design while keeping a unified look across all pages.

1. Widget Branding Settings
- Found under Settings > Widgets [NEW] > Widget Branding Setting.
- Define your logo, brand name, and brand colors once — these will automatically apply to all new widgets, as well as to your branded login and registration pages.
2. Individual Widget Colors
Each widget can be further styled individually in its setup. You can customize the following color areas:
- Text – used for headings and general text.
- Background – sets the background of the widget.
- Primary – defines button and filter highlights.
- Card text – controls the text color inside cards for better readability.
- Card background – defines the color behind activity or product cards.
💡Tip: Maintain good contrast between your text and background colors, and make sure your primary color stands out clearly for call-to-action buttons to ensure readability.
3. Fonts
If you want the text to better match your website’s fonts, you can adjust font styles that blend well with your design.
4. Consistency Across Widgets
For a professional and coherent website:
- Use the same color scheme for all widgets.
- Apply a consistent page layout (e.g. heading structure, spacing, and placement).
- Preview each widget before publishing to check visual harmony between sections.
🎯 Configure What’s Shown in Your Widgets

Each widget gives you flexible options to decide what content appears on your website.
Taking a few minutes to plan these filters helps you present the right information to the right audience — whether that’s a full schedule overview or a focused landing page for a single retreat or pricing group.
1. Filter What Appears
Depending on the widget type, you can pre-filter what’s displayed:
|
Widget |
Available filters |
Use case example |
|
Schedule |
Teacher, Sport, Activity group |
Create separate calendars per instructor, sport or your personally defined activity group (e.g. “Pre-Natal”, “Traditional dances”, “Children classes” activities) |
|
Activities |
Activity types (e.g. workshops, retreats, courses), Start and end date |
Promote a specific category like “Summer Courses” |
|
Prices |
Service groups |
Highlight student memberships or trial offers |
|
Videos |
Video categories, Teachers, Sports, Level, Language |
Create a widget for a specific theme, e.g. “Yoga for beginners” |
2. Create Multiple Widgets for Different Audiences

You can create as many widgets as you need to showcase your offerings the best possible way.
Let’s take a look at a few examples:
- On your homepage you could show all your activities in a calendar view in an unfiltered Schedule widget
- You might create subpages for each of your teacher with a schedule widget showing your specific teacher’s activities
- You might target special groups with special activities offerings and create a page for pre-filtered Schedule widget for the suitable activities for e.g. pregnant or senior participants
- You can create separate widget to highlight e.g. your workshops and teachers trainings. by filtering down for Activities widget by an activity type (or choose to keep all your special together in one view)
- Highlight special offer with a separate filtered Prices widget for your try-out offers, memberships or seasonal summer price for better visibility
💡 Tip: Use clear internal names (like “Main schedule” or “Teacher Lisa calendar”) so you can easily manage and edit widgets later from the overview page.
🌐 Integration Options: Embedded or Linked
There are two main ways to use your widgets on your website: you can embed them directly on a page or link to them externally.
Both options lead to the same booking experience — the main difference is where the widget is displayed and how visitors access it.
1. Embedding Your Widget

Embedding is the best option if you want your widget to appear directly within a page on your website.
This keeps the visitor on your site and creates a smooth, fully branded experience.
Use embedding when:
- You want your widgets to appear as part of your website layout.
- Your content management system (CMS) allows adding custom HTML or embedding code.
- You want to control how the widget fits visually with your page design.
The new widgets no longer use iframes — they integrate securely and are fully mobile-responsive.
2. Linking to Your Widget

If embedding isn’t possible (for example, if your CMS doesn’t support it), you can simply link to your widgets from a button or text link, such as:
“Check out our current schedule” or “View our offers”.
Linking is also a great option for:
- Social media posts (e.g. “Book your spot now!”).
- Email newsletters.
- QR codes on posters or flyers.
Each widget in the Widget Overview has a shareable link that you can copy and use wherever you like.

|
 |
Note – Don’t Embed Sharable Widgets:
Sharable widgets (the full-page version with your branded header) should never be embedded into your website.
They already include your brand name, logo, and color styling — and embedding them would only be possible via an iframe, which is not recommended for performance and security reasons.
Instead, link to Sharable widgets directly using a call-to-action button or text link.
🔧 Need help with the technical steps? See our detailed article: How to Integrate the New Widgets
🔗 Linking to Specific Activity or Product Detail Pages
In addition to your widgets, you can also link directly to a specific activity or product page.
These pages automatically use your Widget Branding Settings, so your logo, colors, and font will appear consistently — even when customers visit from an external link.
When to Use a Direct Link
- You want to highlight one special activity, such as a workshop or retreat, instead of showing the entire Activities widget.
- You want to promote a specific product (e.g. “Buy a trial pass now”) directly from your homepage, newsletter, or social media post.
How to Copy the Link

- Go to the relevant activity or product in your Eversports Manager.
- Click on the three dots (⋮) next to the item.
- Select "Share link" to get the direct URL to that activity or product detail page.
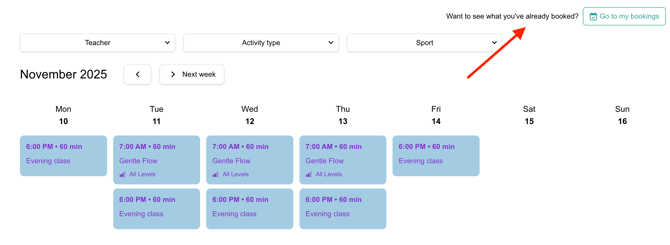
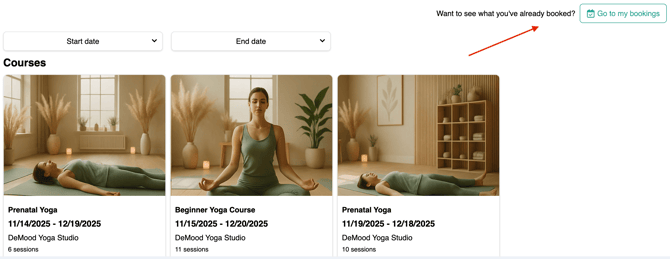
👤 Linking to User Profiles and Login/Registration Pages
Your widgets can now include direct links to the user profile, helping your customers access their own bookings, memberships, or videos with one click.
This creates a more connected experience between your website and the Eversports platform.
1. Linking to the User Profile
Depending on the widget type, you can enable an option that lets customers open the relevant section of their user profile:
|
Widget |
Set up & Profile link destination |
Link on the widgets |
|
Schedule |
|
|
|
Activities |
||
|
Prices |
|
|
|
Videos |
|
|


You can toggle these options when creating or editing a widget in the Eversports Manager.
When turned on, logged-in users will see a link in the widget that takes them directly to their profile.
💡 Example: A customer browsing your Prices widget can click “My passes and memberships” to view their active products in their Eversports profile.
2. What Happens for Logged-Out Users

If a user isn’t logged in, clicking a profile link will redirect them to a branded login or registration page.
This page automatically displays:
- Your venue name and logo (or brand name/logo for multi-venue providers)
- Buttons styled with your primary brand color
After logging in or registering, users are redirected back to the page they started from - ensuring a smooth, branded flow throughout.
3. Optionally link Login and Registration options

You can also share standalone login and registration links directly from the Widget Overview. Click the three dots (⋮) next to a widget and choose Share link to copy the links or open them in a new tab.
These links are useful for adding a “Login” or “Registration” button to your website navigation.
🔗 Related Articles
If you’d like to dive deeper into specific topics or need technical guidance, take a look at these related articles:
- How to Integrate the New Widgets
Step-by-step instructions for embedding or linking your widgets on your website. - Customizing Your Schedule Widget
- Customizing Your Activities Widget
- Customizing Your Prices Widget
- Customizing Your Vouchers Widget
- Customizing Your Videos Widget
- Customizing Your Newsletter Widget